

In this blog, we’ll explore how to create a simple yet functional music player using the ESP32 microcontroller, DFPlayer Mini module, and three buttons to control the playback. This project is a great way to understand the basics of serial communication and how to interface audio modules with microcontrollers. We’ll dive into the hardware setup, code, and the communication protocol used between the ESP32 and DFPlayer Mini.
Introduction to Components
- ESP32
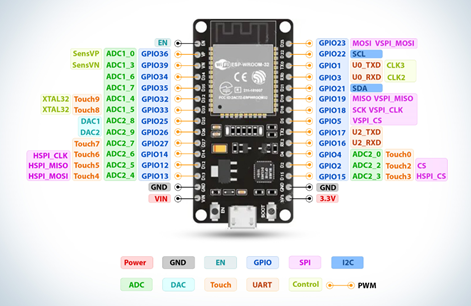
The ESP32 is a powerful microcontroller with integrated Wi-Fi and Bluetooth, making it ideal for IoT projects. With its dual-core processor and a wide range of GPIO pins, the ESP32 can handle multiple tasks simultaneously.

- DFPlayer Mini
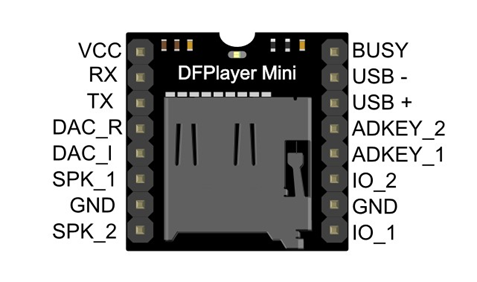
The DFPlayer Mini is a small, low-cost MP3 player module that can play music from a microSD card. It can be controlled via a serial interface, making it easy to integrate with microcontrollers like the ESP32. The DFPlayer Mini has an onboard DAC and amplifier, allowing it to directly drive small speakers.

- Push Buttons
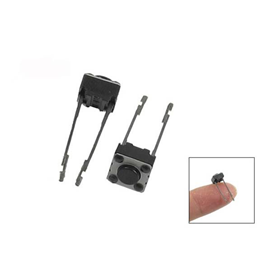
We’ll use three push buttons for user input: one for play/pause, one for skipping to the next track, and one for returning to the previous track. These buttons will be connected to the GPIO pins of the ESP32.

Communication Protocol: UART
The communication between the ESP32 and the DFPlayer Mini is handled via UART (Universal Asynchronous Receiver/Transmitter). UART is a simple, robust serial communication protocol widely used in embedded systems.
How UART Works
- TX and RX: UART uses two main lines for communication—TX (transmit) and RX (receive). The TX pin of the ESP32 is connected to the RX pin of the DFPlayer Mini, and the RX pin of the ESP32 is connected to the TX pin of the DFPlayer Mini.
- Baud Rate: UART communication is asynchronous, meaning it doesn’t use a clock signal to synchronize the data transmission. Instead, both devices must agree on a common baud rate (bits per second). In this project, we use a baud rate of 9600.
- Data Format: UART data frames typically include a start bit, 8 data bits, an optional parity bit, and one or more stop bits.
Why Use UART for DFPlayer Mini?
The DFPlayer Mini supports various modes of communication, including UART, AD key mode, and IO mode. UART is preferred because it offers greater control over playback functions, including the ability to select tracks, control volume, and manage the playback state (play, pause, stop, etc.). This flexibility is essential for creating a responsive music player.
Hardware Setup
Components Needed
- ESP32
- DFPlayer Mini
- 3 Push Buttons
- Speaker
- MicroSD Card (formatted as FAT32)
- Wires and Breadboard
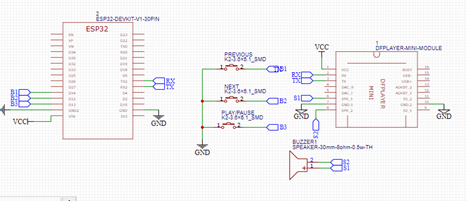
Circuit Diagram
Here’s how to wire everything together:
- DFPlayer Mini to ESP32:
- TX (DFPlayer Mini) -> RX (ESP32)
- RX (DFPlayer Mini) -> TX (ESP32)
- VCC (DFPlayer Mini) -> 5V (ESP32)
- GND (DFPlayer Mini) -> GND (ESP32)
- SPK_1 and SPK_2 (DFPlayer Mini) -> Speaker
- Buttons to ESP32:
- Play/Pause Button: One side to GPIO 13, other side to GND
- Next Track Button: One side to GPIO 12, other side to GND
- Previous Track Button: One side to GPIO 14, other side to GND

Explanation
- Power: The DFPlayer Mini is powered by the 5V pin of the ESP32, and the speaker is connected directly to the module’s speaker outputs.
- Buttons: Each button is connected to a GPIO pin of the ESP32, with the other side connected to ground. When pressed, the button pulls the GPIO pin to a low state, which the ESP32 detects as a button press.
Writing the Code
Libraries Required
To get started, you’ll need the DFPlayerMini_Fast library, which simplifies communication with the DFPlayer Mini. You can install it via the Arduino IDE’s Library Manager.
Code Explanation
Here’s the complete code for the project:
#include <Arduino.h>
#include “DFRobotDFPlayerMini.h”
#define PLAY_PAUSE_PIN 13
#define NEXT_TRACK_PIN 12
#define PREV_TRACK_PIN 14
HardwareSerial mySoftwareSerial(1); // Use Hardware Serial port 1
DFRobotDFPlayerMini myDFPlayer;
int songNumber = 1;
int songsCount = 1;
bool isPlaying = true;
void nextSong();
void prevSong();
void checkButtons();
void setup() {
pinMode(PLAY_PAUSE_PIN, INPUT_PULLUP);
pinMode(NEXT_TRACK_PIN, INPUT_PULLUP);
pinMode(PREV_TRACK_PIN, INPUT_PULLUP);
mySoftwareSerial.begin(9600, SERIAL_8N1, 16, 17); // Speed, type, RX, TX
Serial.begin(115200);
Serial.println();
Serial.println(F(“DFRobot DFPlayer Mini”));
Serial.println(F(“Initializing DFPlayer … (May take 3~5 seconds)”));
while (!myDFPlayer.begin(mySoftwareSerial)) {
Serial.println(F(“Unable to begin”));
delay(500);
}
Serial.println(F(“DFPlayer Mini online.”));
songsCount = myDFPlayer.readFileCountsInFolder(1);
myDFPlayer.volume(20); // Set initial volume
myDFPlayer.EQ(DFPLAYER_EQ_NORMAL);
myDFPlayer.outputDevice(DFPLAYER_DEVICE_SD);
myDFPlayer.playFolder(1, songNumber);
}
void loop() {
if (myDFPlayer.available()) {
uint8_t type = myDFPlayer.readType();
if (type == DFPlayerPlayFinished) {
nextSong();
}
}
checkButtons();
}
void nextSong() {
songNumber = (songNumber % songsCount) + 1;
myDFPlayer.playFolder(1, songNumber);
}
void prevSong() {
songNumber = (songNumber – 2 + songsCount) % songsCount + 1;
myDFPlayer.playFolder(1, songNumber);
}
void checkButtons() {
if (digitalRead(NEXT_TRACK_PIN) == LOW) {
nextSong();
delay(500); // Debounce delay
}
if (digitalRead(PREV_TRACK_PIN) == LOW) {
prevSong();
delay(500); // Debounce delay
}
if (digitalRead(PLAY_PAUSE_PIN) == LOW) {
isPlaying = !isPlaying;
if (isPlaying) {
myDFPlayer.start();
} else {
myDFPlayer.pause();
}
delay(500); // Debounce delay
}
}
Code Breakdown
- Button Initialization: The buttons are connected to GPIO pins, which are set as input with internal pull-up resistors. This configuration ensures that the pin reads HIGH when the button is not pressed and LOW when it is pressed.
- Serial Communication: The software serial port is initialized with a baud rate of 9600, which matches the DFPlayer Mini’s default baud rate.
- DFPlayer Initialization: The myDFPlayer.begin() function initializes the DFPlayer Mini. If the initialization is successful, the volume is set to a medium level.
- Button Handling: In the loop() function, each button is checked in turn. If a button press is detected, the corresponding action is taken:
- Play/Pause Button: Toggles between playing and pausing the track.
- Next Track Button: Skips to the next track.
- Previous Track Button: Returns to the previous track.
- Debouncing: A simple delay of 500ms is used to debounce the buttons, preventing multiple triggers from a single press.
Steps to Make the IoT Music Player Project
Step 1: Gather the Components
- ESP32
- DFPlayer Mini
- 3 Push Buttons
- SD Card (with MP3 files loaded)
- Connecting Wires
- Breadboard (optional)
Step 2: Connect the Hardware
- DFPlayer Mini:
-
- VCC to 5V on ESP32
- GND to GND on ESP32
- RX to GPIO 16 (TX of ESP32)
- TX to GPIO 17 (RX of ESP32)
- SPK1 and SPK2 to a speaker
- Buttons:
-
- Play/Pause Button: Connect to GPIO 13.
- Next Track Button: Connect to GPIO 12.
- Previous Track Button: Connect to GPIO 14.
- Other Pin of Each Button to GND.
Step 3: Prepare the Code
- Open the Arduino IDE and install the DFRobotDFPlayerMini library.
- Copy the provided code into a new sketch.
Step 4: Upload the Code to ESP32
- Connect the ESP32 to your computer via USB.
- Select the correct board and port in the Arduino IDE.
- Upload the code.
Step 5: Test Your Music Player
- Insert the SD card with MP3 files into the DFPlayer Mini.
- Power up your ESP32.
- Use the buttons to play/pause, switch to the next track, or go back to the previous track.
Conclusion
This project is a great way to learn about interfacing the ESP32 with peripheral devices using UART communication. By combining the ESP32, DFPlayer Mini, and some basic buttons, we’ve created a functional music player with play/pause, next, and previous track controls.
Extending the Project
Once you’ve mastered this basic setup, you can extend the project in various ways. For instance, you could add a display to show the current track or integrate a remote control for easier navigation. You might even consider designing a custom PCB to house all the components neatly. When it comes to producing the final version of your project, working with a reliable PCBA manufacturing service ensures that your PCB assembly is handled with precision and quality.
This project not only enhances your understanding of UART communication but also provides a solid foundation for more complex embedded systems projects.
Happy building!